Simple Procedure to Optimize Performance
Before you start setting up your rig you need to check out some of these basics
1: Make Sure the mast is braced securely to the hull at its foot.
2: At deck level the mast should have no sideways movement and have chocks to stop forward movement.
3: A way to achieve needed rig tension either Muscle Box or cascade system
4:A rig tension gauge and a tape measure of at least 24′ (8m) and a straight edge like a batten 40″ (975mm)
The following 3 steps of mast set-up are interrelated and so need to be repeated until the base settings are archived.
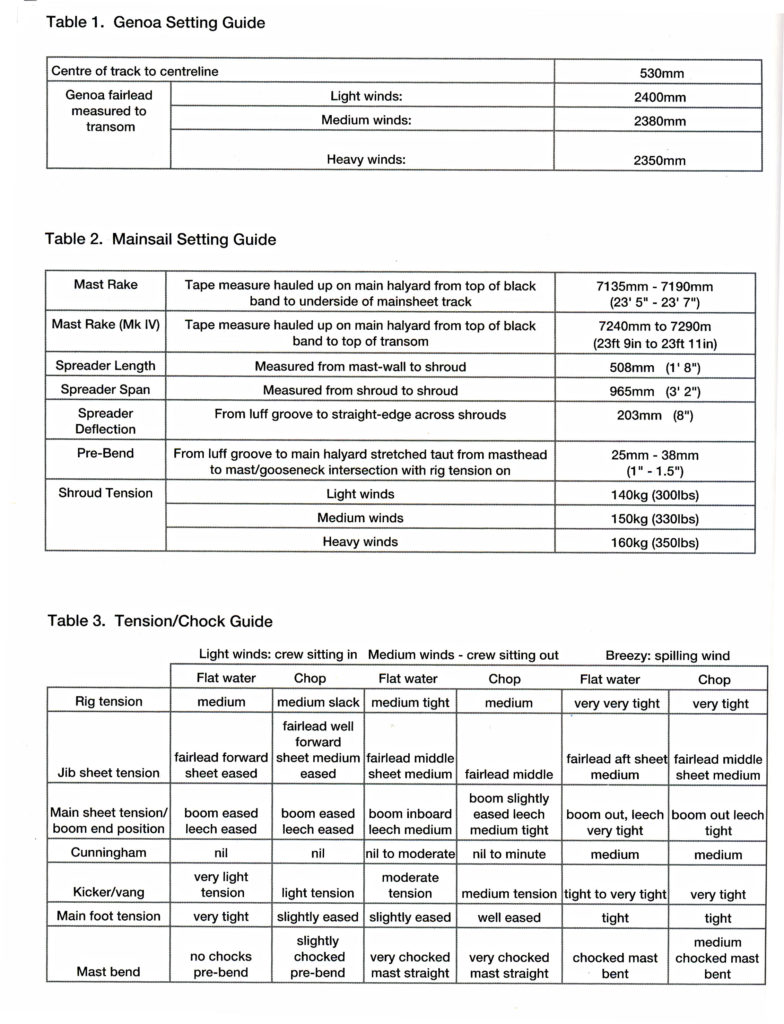
1: Set the spreader lengths and angles, this controls the prebend of the mast to match the luff curve in the mainsail.
It’s important to set the spreaders correctly before fitting the mast to the boat. Each spreader should be set to 508mm as above diagram measured from mast wall to the shroud. It’s important the angle of the spreaders are equal on both sides and spreaders are fixed. To start with the measurement from shroud to shroud should be 965mm as above digram. The defection the distance between the luff grove and a line running from shroud shroud should be 200mm as shown in diagram above.
2. Mast foot position and rake
Before you step the mast make sure all mast chocks are removed. Step mast and attach shrouds and forestay but do not tension. Next remove mast pin so the mast step is taking full weight of the mast. This is a good time to check the mast is free to move fore and aft at deck level but has no side to side play. At this point pull the heal of the mast back till it’s touching the pin in the mast step. It’s now time to load the Genoa and tension the rig to 150kg. Next step is to push the mast forward at the height of your spinnaker pole ring this will allow the mast to take the prebend the spreaders are dictating if it has not already done so. First check is to see if you can get your mast pin to go through without restriction. The mast pin should be no thicker the a 1/4″ and should be able to slide in with no or very little resistance. If the mast pin goes in we are ready to check the rake.
Ouch if the pin will not go through. If it’s hitting the front or back of the pivot hole in the mast do not sweet skip to section 3 checking rake then recheck pin for fit. More to come on corrections if rake is right. If the pin will not go through because it’s fitting the top of the pivot hole you will have to put a shine under the mast foot. The worst case would be the pin hitting the bottom of the pivot hole in the mast then depending on your boat you will have to figure out the best solution. I have only seen this problem on one kit boat since I stared sailing with Al in the mid 1980’s. Ok if your rake is right and the pin is still hitting the front or the back of the pivot hole in the mast you will need to take the rig tension off and adjust the pin in the mast step which controls how far the foot of the mast comes back.
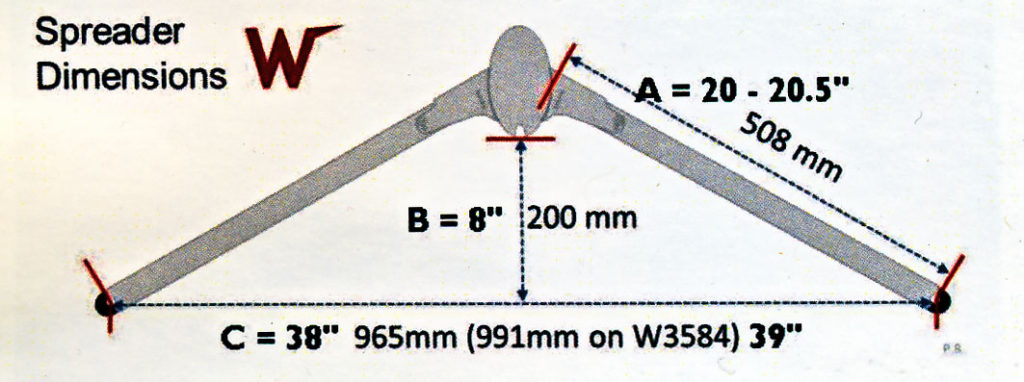
3. Setting the Mast rake
Mast is steeped rig tension is 150kg mast has been pushed forward at spinnaker pole loop to make sure pre bend is set. Mast pin is out. Let’s set the rake.
Attach tape measure to main halyard and raise it to 5.866m (19′ 3″) from the top to the middle band #1 as shown in above digram above. Cleat the main halyard at this point then take the measuring tape to the stern of the boat and measure the distance to the top of the transom. Mark IV should be 7.24m to 7.29m (23′ 9″ to 23′ 11″) all other Mark’s 7.14 to 7.185 (23′ 5″ to 23′ 7″) measured to the bottom of the trailer rail. You may need to adjust the length of the shrouds to achieve this. Once you are in the range drop main halyard and make tight down the back grove of the mast to check prebend, you should have a gap of about 25mm to 38mm (1″ to 1.5″) between the halyard and and the mast grove at it widest point. If all is ok time to go sailing. If you can not achieve desired settings back to step #1. Note some old Mast and Marks may need they’re spreader angles adjusted slightly to achieve the settings.